How to Disable the Find My iPhone Feature: A Step-by-Step Guide

For professionals relying on their iPhones for work, the Find My iPhone feature is a powerful tool to locate a lost or stolen device. However, there are times when you need to disable it, such as before selling, trading in, or repairing your phone. At Repair Hub, we understand the importance of managing your device securely. This guide explains how to turn off Find My iPhone safely and why it matters, ensuring your professional data stays protected.
Why You Might Need to Turn Off Find My iPhone
Find My iPhone, part of Apple’s Find My app, helps track your device’s location, play a sound to find it, or lock it remotely if lost. It also includes Activation Lock, which ties your iPhone to your Apple ID to prevent unauthorized use. While this boosts security, it can complicate tasks like selling, gifting, or repairing your device. For example, repair shops often require Find My iPhone to be disabled to access the device without restrictions. Turning it off ensures a smooth process while protecting your data, but it must be done correctly to avoid issues.
How to Disable Find My iPhone on Your Device
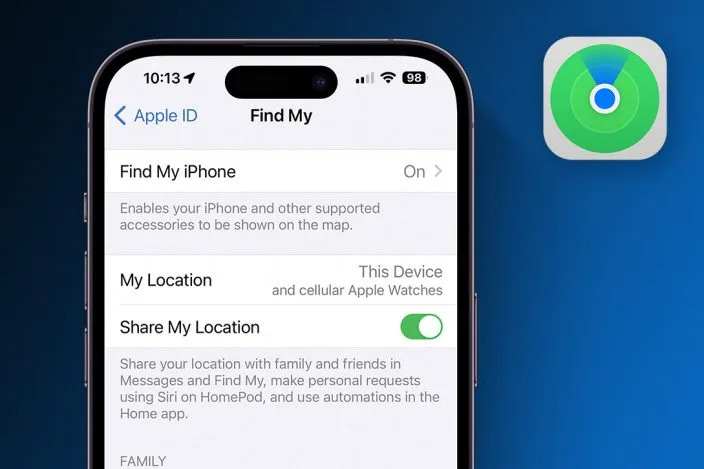
Follow these steps to turn off Find My iPhone directly from your iPhone:
- Open Settings: Tap the Settings app on your iPhone.
- Access Your Apple ID: Tap your name at the top, then select Find My.
- Turn Off Find My iPhone: Tap Find My iPhone, then toggle the switch to the off position. Enter your Apple ID password when prompted to confirm.
- Verify: Ensure the toggle is gray, indicating the feature is disabled.
If your iPhone is offline or not accessible, you can disable Find My iPhone via iCloud.com:
- Visit iCloud.com: Open a browser on any device and go to icloud.com.
- Sign In: Log in with your Apple ID and select Find iPhone.
- Remove the Device: Choose your iPhone from the top menu, click the X next to it, and confirm. This works only if the device is offline.
Always have your Apple ID password ready, as it’s required to disable the feature.
Key Considerations Before Disabling Find My iPhone
Disabling Find My iPhone removes an important layer of security, so proceed with caution. If you’re selling or gifting your device, disabling it ensures the new owner can use it without being locked out by your Apple ID. However, this also means your device won’t be traceable if lost or stolen. For repairs, many service centers require Find My iPhone to be off to avoid complications, but confirm with the shop first. Additionally, if you have AppleCare+ with Theft and Loss protection, avoid removing the device from Find My until your claim is fully approved to maintain coverage.
Protecting Your Data After Disabling Find My iPhone
Turning off Find My iPhone doesn’t erase your data, so take extra steps to secure your information. Before selling or repairing, back up your iPhone to iCloud or a computer to preserve contacts, documents, and work-related files. Then, perform a factory reset (Settings > General > Transfer or Reset iPhone > Erase All Content and Settings) to wipe personal data. If you suspect your Apple ID is compromised, change your password immediately at appleid.apple.com to protect your accounts. These steps ensure your professional data stays safe during the transition.
Need Help? Let Repair Hub Assist
Disabling Find My iPhone is straightforward but critical for tasks like repairs or device transfers. If you’re preparing your iPhone for service or need help with data backups, bring it to Repair Hub in Sacramento for a free checkup. Our team offers fast, reliable support to keep your phone ready for work. Visit or call Repair Hub today to ensure your device is secure and functional!


